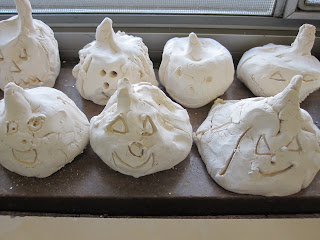
I love clay. I just love it. There's only enough time and materials for about one project per grade, per year, but the kids always love it, and I'm sure the parents do, too.
Now, I'm one of those lucky ducks who has a kiln, and if I didn't, I would be knocking on every door to get one. Most schools I've worked at have gotten one through a grant. They can even be found used on Craigslist and eBay and the like, but schools can be touchy with ordering from those places and there's always the risk that you won't get what is advertised. I've heard that the Crayola air-dry clay works great, but it is pricey.
The past few years I have been using Sax White Art Clay and have been firing it at cone 05, because it is the cheapest I can find through our supplier. However, I love Versa Clay... I don't remember the brand, but it is the softest clay I've ever used and it fires to a nice white.
I also like Sax Gloss Glazes. They are a little cheaper than Amaco (which is also good), but work just as well, in my opinion.
Every art teacher I've ever known has done this clay project, and I never thought I would. But I tried it this year, and I love it, especially with my little first graders. It's basically just a pinch pot with a pinched stem and a face or lines drawn on it. I have them watercolor them after firing, which actually gives a nice saturation of color. I'll probably glaze them next year, but I just didn't think about it early enough this time.
If you've never done clay before, here are my tips:
1. Check the clay the day before you teach the lesson. Sometimes a hole gets poked in the bag during delivery, and the clay might be too hard to work with. If this happens, I ball up the clay into project-size portions, and then spray them in a plastic bag with a water bottle. This usually moistens it enough to work with the next day.
2. Don't blow your budget on expensive clay tools. I've gotten away with paperclips, wooden dowels, straws, plastic cutlery, toothpicks, etc. for quite a while now. I do recommend wire for cutting the clay, and a gauging tool if it is needed for the project.
3. Have your students work on cheap paper "placemats" that have their names on them already. That way, you can scratch the names on the projects later and don't have to worry about it during the possible chaos of the lesson. For my elementary kids, I always put their names on the projects so I can read them later. The placemats also help you determine very quickly who is absent and needs either a project made for them so they can paint it with the class or to come in later and do one themselves.
4. For elementary students, use water sparingly. If you can get away with not using it, don't use it... they tend to make mud very quickly. If you have to use it for score/slip, be very specific about how much to use.
5. Give projects plenty of time to dry before putting them in the kiln. For most things, a week will do, but anything thicker than 1/2" or so might need longer, and obviously it depends on your climate. If it is cold to the touch, it is still drying and should not be fired.
6. Be prepared for breakage. Have extra projects for those that break in the kiln or during transport, and have super glue ready for projects that break after having been fired. They are most delicate before firing, so be extra careful.
7. Do the clay project in one class period - I can't even imagine trying to keep projects moist from day to day.
8. Keep projects in a safe place while drying. I move from building-to-building during the week, and so I am not there to guard the projects every day. I usually even put a sign that says, "Do not touch."
9. If you teach multiple classes, use a code for the classroom teacher to go with the student's name. For example, 2nd grade Mrs. Smith would just be 2-S. I think parents might also like the code to keep track of what year the student made the project.


No comments:
Post a Comment