Showing posts with label Halloween. Show all posts

Sunday, October 31, 2010

Happy Halloween!

Just wanted to share a few results from the 3rd grade pumpkin patch drawing I posted about earlier:


Not quite finished, but definitely one for great craftsmanship and neatness.


This was created by one of my autistic students - I love his creativity and the way he thinks about his artwork. The ground is being colored blue because it is a glacier - that never melts, by the way. The yellow creature on the left is named Gordon, and the red devil creature will get his eye back in 26 years.

Have a happy and safe Halloween!

Wednesday, October 27, 2010

1st Grade - Clay Pumpkins

I love clay. I just love it. There's only enough time and materials for about one project per grade, per year, but the kids always love it, and I'm sure the parents do, too.

Now, I'm one of those lucky ducks who has a kiln, and if I didn't, I would be knocking on every door to get one. Most schools I've worked at have gotten one through a grant. They can even be found used on Craigslist and eBay and the like, but schools can be touchy with ordering from those places and there's always the risk that you won't get what is advertised. I've heard that the Crayola air-dry clay works great, but it is pricey.

The past few years I have been using Sax White Art Clay and have been firing it at cone 05, because it is the cheapest I can find through our supplier. However, I love Versa Clay... I don't remember the brand, but it is the softest clay I've ever used and it fires to a nice white.

I also like Sax Gloss Glazes. They are a little cheaper than Amaco (which is also good), but work just as well, in my opinion.

Every art teacher I've ever known has done this clay project, and I never thought I would. But I tried it this year, and I love it, especially with my little first graders. It's basically just a pinch pot with a pinched stem and a face or lines drawn on it. I have them watercolor them after firing, which actually gives a nice saturation of color. I'll probably glaze them next year, but I just didn't think about it early enough this time.
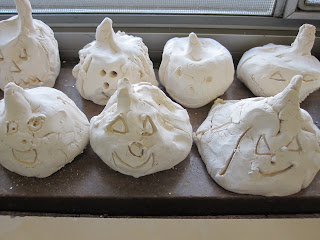
After firing, before painting...


After painting...


If you've never done clay before, here are my tips:

1. Check the clay the day before you teach the lesson. Sometimes a hole gets poked in the bag during delivery, and the clay might be too hard to work with. If this happens, I ball up the clay into project-size portions, and then spray them in a plastic bag with a water bottle. This usually moistens it enough to work with the next day.

2. Don't blow your budget on expensive clay tools. I've gotten away with paperclips, wooden dowels, straws, plastic cutlery, toothpicks, etc. for quite a while now. I do recommend wire for cutting the clay, and a gauging tool if it is needed for the project.

3. Have your students work on cheap paper "placemats" that have their names on them already. That way, you can scratch the names on the projects later and don't have to worry about it during the possible chaos of the lesson. For my elementary kids, I always put their names on the projects so I can read them later. The placemats also help you determine very quickly who is absent and needs either a project made for them so they can paint it with the class or to come in later and do one themselves.

4. For elementary students, use water sparingly. If you can get away with not using it, don't use it... they tend to make mud very quickly. If you have to use it for score/slip, be very specific about how much to use.

5. Give projects plenty of time to dry before putting them in the kiln. For most things, a week will do, but anything thicker than 1/2" or so might need longer, and obviously it depends on your climate. If it is cold to the touch, it is still drying and should not be fired.

6. Be prepared for breakage. Have extra projects for those that break in the kiln or during transport, and have super glue ready for projects that break after having been fired. They are most delicate before firing, so be extra careful.

7. Do the clay project in one class period - I can't even imagine trying to keep projects moist from day to day.

8. Keep projects in a safe place while drying. I move from building-to-building during the week, and so I am not there to guard the projects every day. I usually even put a sign that says, "Do not touch."

9. If you teach multiple classes, use a code for the classroom teacher to go with the student's name. For example, 2nd grade Mrs. Smith would just be 2-S. I think parents might also like the code to keep track of what year the student made the project.

Tuesday, October 26, 2010

1st Grade - Owls

This is a good lesson for directed-drawing and combining shapes to make an object - an owl! We also use crayon-resist, which is always like magic for my little first graders. We start out by drawing the owl together in steps:

We also draw the moon - students can choose either a full or quarter. We then outline the drawing with Sharpie and color it in with crayon (except the sky!). We then use a yellow crayon to make the stars while pressing VERY HARD. If they don't know how to make a "star," I just tell them to make little "scribbly circles." We finish it off by painting black paint over the sky, and the stars appear under the paint like magic!

I like to incorporate literature and writing wherever I can, and with this project, I had good opportunity to. I started the lesson by reading the chapter "Owl and the Moon" from the book Owl at Home. We finished the lesson by doing some writing. I typed up a sentence starter that said, "It was a chilling night in (our school's town). The spooky owl spied on a ______." and the students completed the sentences with an adjective and a noun. It made for an awesome display!

Sunday, October 24, 2010

3rd Grade - Paper Mache Pumpkins

Paper Mache is messy... there is no way around it. But, it is an inexpensive 3-D project that I think every elementary student should experience. In the past, I've made pinatas and Chinese lanterns, but this time, it's pumpkins. First, I'll explain how I taught the project this time, and then I'll tell you what I'll change for NEXT time (we're always learning as we go, aren't we?). This is going to be a long post, and I apologize for the wordiness, but I'm hoping if you're hesitant about trying this, you might give it a shot if I explain how I did it.

Prep Work:

1. Because I only wanted to do one day of the paste (much easier, believe me), I pre-assembled the structure. I blew up balloons, and then attached a toilet paper roll at the end for the stem. To attach it, I cut slits in the end so it would "flower out" and stick to the end with masking tape. Sorry I don't have a picture of this... I also glue the students' name tags inside the tube so that I can tell them apart.

2. I also arrange my room in a different way to make things go easier. I use half of my tables for the pasting, and the other half as a "clean area" for students to go do a drawing assignment when they are finished. On the messy half, I lay out newspaper or some sort of covering for easy clean-up afterward... I can turn the messy tables into clean tables as students finish.

3. For the paste, I swear by Elmers or School Specialty Art Paste. It's a powder that comes in a little box and mixes with a gallon of water. The trick is to use cold water and stir as you pour so it doesn't get clumpy. It's unscented and doesn't mold like homemade mache tends to... plus it's cheap. It has to sit for at least 15 minutes after mixing, then I pour it into low pans.

4. Rip the newspaper. I like to do this in front of the TV the night before. I rip a whole page in half, against the grain, then rip 2-3 inch strips with the grain.

5. Have paper towel ready. Have large pieces ready to go. I take a roll and cut a slit in it, top to bottom, with a utility knife so the pieces just come off.

Mache Day:

1. I start out by quickly demonstrating how to dip both sides of a newspaper strip into the mache, using "scissor fingers" to squeegee the excess off back into the tray, and then smoothing it down onto the balloon and tube. I tell them they have to do at least 2-3 layers of newspaper, and then finish with ONE layer of paper towel. The only purpose of the paper towel is to have a solid color on the outside so you can't see the newspaper letters and pictures when you paint. The paper towel is just put dry onto the wet balloon, and then smoothed out with a little mache on the hand.

2. When students indicate they are finished with the newspaper, we check to make sure that there is no balloon showing, and also that there is no where that the newspaper is so thin that you can see the color of the balloon underneath it. If it's good, then I give them the paper towel.

The pumpkins need to dry about a week, and rotated throughout so all areas can dry. Before painting day, I pop the balloon and dent the bottom so it will stand up.


Then, they paint! I had a few students who don't celebrate Halloween, so they can just paint lines down the pumpkin for a regular fall pumpkin instead of a jack-o-lantern.


It really was pretty successful, though I might make a few changes next time. Someone at an art ed conference told me that instead of newspaper, they use colored bulletin board paper. This saves the step of painting. I'm thinking it might work well if we paper mached orange bulletin board paper on the balloon alone (no roll). They could paper mache a nametag on the bottom so they could be told apart. Then, after drying, the roll can be glued to the top and painted, along with a face. Less prep for the teacher, more doing for the students.

Almost all students agreed this project was a ton of fun (possibly their all-time favorite), even though I feel like a crazy frenzied teacher when we do it. Definitely worth it for all!


Friday, October 22, 2010

Bats at the Library


This book is super adorable, I must say. Brian Lies has a whole series of Bats at the (Somewhere).... I also enjoy Bats at the Beach. This lesson is very versatile... another version I like to do is with cut paper and glitter for the stars. Either way, it's a good combination of art and literature, and is simple enough that it can be completed in the midst of Halloween party craziness. I once had a sub teach this lesson and he really took off with it and discussed some fun facts about bats with my class - I thought that was wonderful!

Wednesday, October 20, 2010

Halloween Mash-Up

Well, it's been a good long while, hasn't it? I guess starting out, blogging is difficult to be motivated to update without many followers. But, on the flip side, I'm not comfortable 'marketing' this blog until I have a good set of content to fall back on - and proof that I will actually continue to update so it's even worth following.

So, I am back. Now that I am getting used to our new schedule at school, I am ready to squeeze in some time to post.

I am a sucker for holiday projects, ESPECIALLY Halloween. I don't get into Christmas projects as much for whatever reason, but spooky, creepy, and silly lessons are where it's at. For the next few days, I am going to be overloading you with Halloween lesson ideas, as the 31st is coming up fast! Of course, there are always students who don't celebrate some or all holidays, so I have alternatives ready to go as well.

First, I have a Pumpkin Patch project, which I teach to my 3rd graders. It seems like a simple drawing, but there are tons of vocabulary words and drawing skills jam-packed in it. I start by showing my example, below, and asking students why some pumpkins LOOK closer than others. They are always inclined to say, "Because it's closer...", but I insist that it is not actually closer, I just used some drawing "tricks" to make them look that way. Eventually we discover together...

Objects that look closer are...
1... bigger
2... lower on the paper
3... overlapped in front
4... drawn with more detail


We also briefly cover horizon line, foreground, middle ground, and background, and I show them quickly how to make a road/river/railroad tracks that come from the background to the foreground.

Whew!

Students are then free to draw their pumpkin patch and add whatever details they want. It can be a Halloween-themed patch, but it doesn't have to - it can just be a farm or whatever. Before outlining with Sharpie and coloring in with crayons or colored pencils, I usually have students check their drawings with me to be sure they have enough DETAIL. I'll post some kid results later on.