Showing posts with label 2nd Grade. Show all posts

Friday, November 19, 2010

1st Grade - Color Mixing Turkey Collage

This is one of those lessons that I really feel is a keeper. I'm the kind of art teacher who could never do all the same projects year after year, but there are some that I have cemented into my curriculum, and this is one of them.

This takes me two 50-minute sessions. In the first session, I start with a 12x18" piece of white sulfate paper, and have the students fold it into 8 long rectangles. With first grade, this can be quite an experience, but if I take it slow and I check them after each step, I usually only have one or two per class that don't fold it correctly the first time.

We then go through each rectangle and make a pattern of shapes with crayon. The first is blue, second is yellow, third is red, fourth is red/yellow, fifth is red/blue, sixth is yellow/blue, which leaves two blank. I then tell them to watercolor each rectangle with the colors they used in their patterns. If there are two colors in the pattern, they have to mix them, starting with the lightest color first. I love this step because it allows them to discover the secondary colors on their own to see which colors make what. I then let them paint the blank ones however they want, or they can use them to make a color they messed up on before.


During the second class period, we turn the watercolored paper into feathers and create a turkey collage. I happen to be at the Michigan Art Education Association Conference when it was time for my classes to do this part of the lesson, so I made visual posters to direct the students through each step.


I tested it out with a few classes before I left, and I loved how self-directed and independent my little first graders were. I did give them stencils for the body, head, and feathers, and then pre-cut the beak and feet paper into two-inch yellow squares. I then added the googly eyes as a fun way to finish them off.

I love me some googly eyes...


Let me also share with you that I followed up this lesson with my own version of Deep Space Sparkle's Color Mixing Fish. I thought it was a great way to tie up my turkey lesson because they were still mixing colors, but with a slightly different medium (tempera). Hopefully I'll have some of these results up soon!

Thursday, November 4, 2010

2nd Grade Clay Turkeys

It's about that time again... Thanksgiving is coming up fast, and then winter break is just a hop, skip and a jump away. With conferences in between, there's only so much time to squeeze this project in and get them fired. Here is a step-by-step tutorial to get you started... fired and painted projects to be shown at a later time:

Start with a ball of clay.

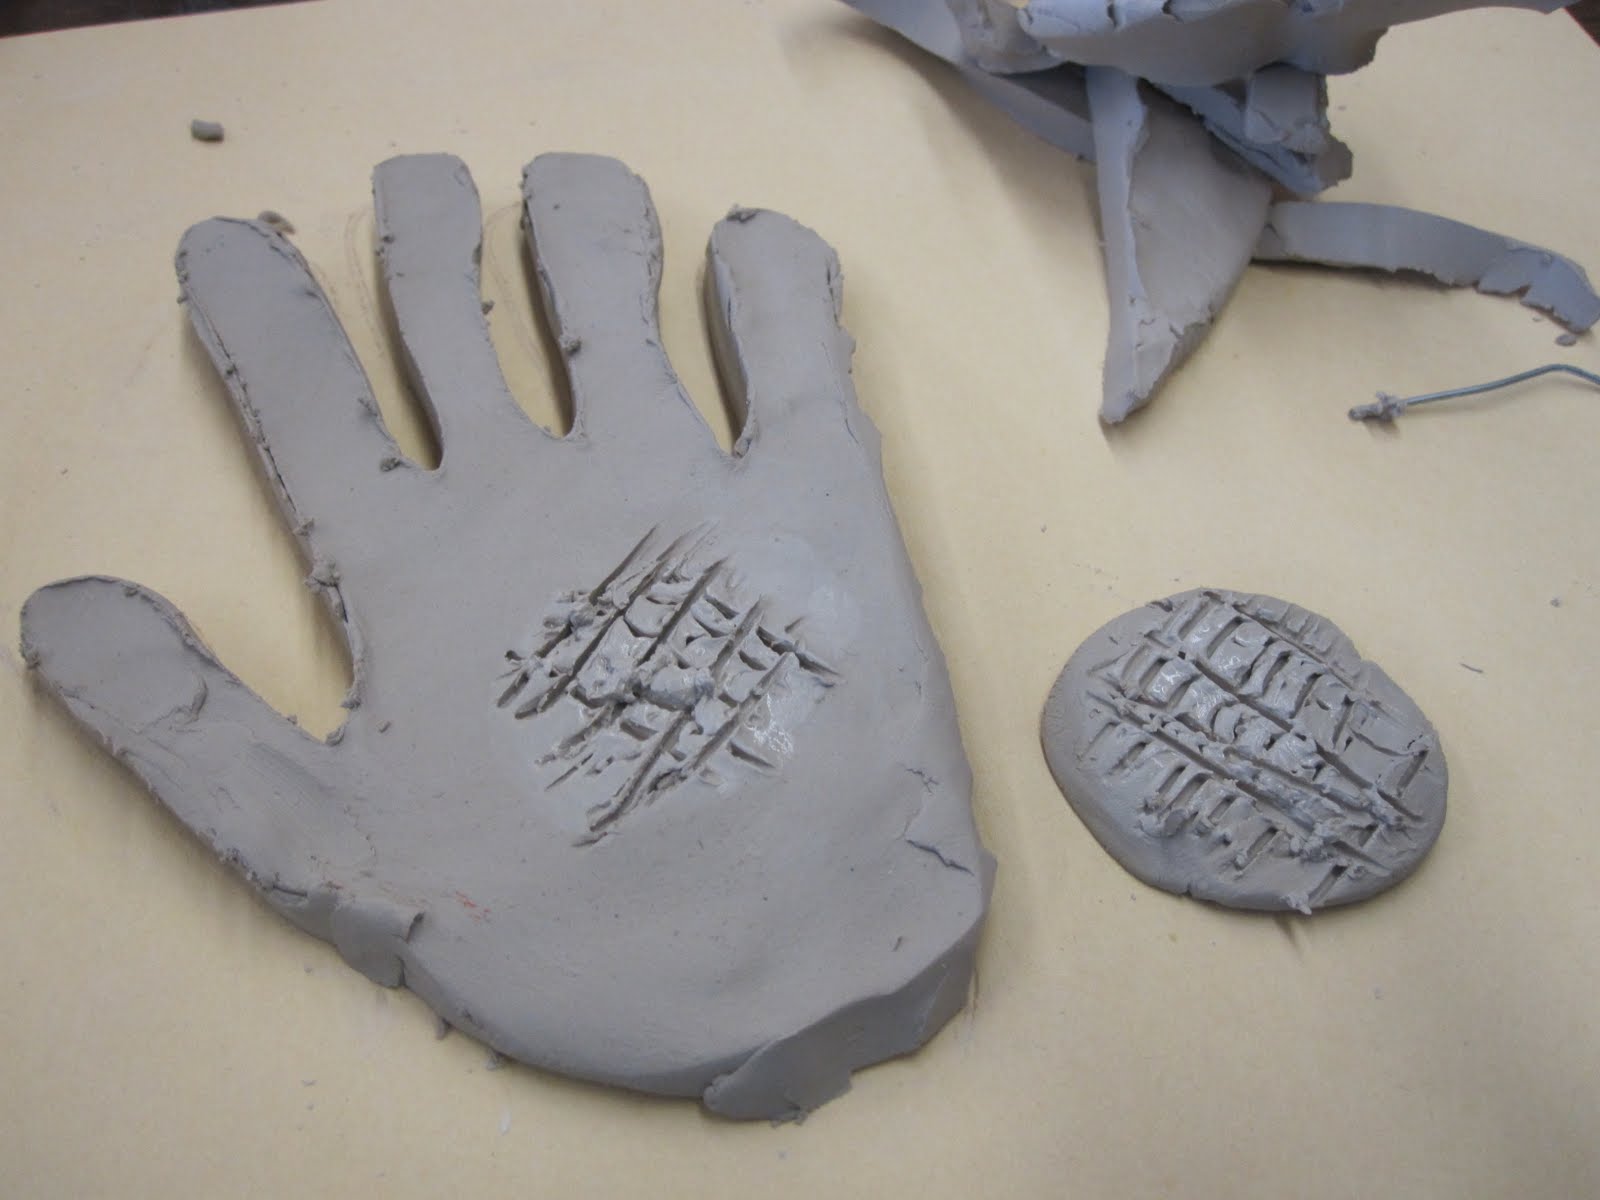
Flatten it out into a "pancake." I tell my students to use the side of their fist. Yes, it's loud for a while, but it saves me time from having to roll them out myself and the cost of rolling pins. I tell them to stop flattening it as soon as they can fit there hand into the pancake.

Trace the hand with a paperclip.

Then use the paper clip to cut all the way through the traced hand, and remove the excess.

Use the excess clay to roll out a marble-sized ball and flatten it out.

Score and slip the circle into the middle of the hand. Instead of "score and slip," I tell them to "wet, scratch, wet." They scratch a "checkerboard" into both surfaces to be stuck together, wet them a little bit with water, then scratch again. I insist that they are sure not to skip this step, or the pieces will fall apart once the clay dry. Sure enough, I've already lost a foot on one of the projects... Add feet using two smaller marbles of clay and same procedure as face.

Add toes, eyes, beak, and snood (what kid won't get a kick out of that word?!).

Since the finished project is flat, I also like to add holes at the top so it could be hung.

For my general tips for doing a clay project with a class, see Clay Pumpkins.

Enjoy!

Thursday, January 7, 2010

Winter Stamps

Well, winter break is over but winter is not. Bring on the winter projects!

Today I bring you a favorite of mine - winter stamps. I do this lesson with second graders in two 35-minute sessions. The first day, we look at stamps and talk about them. Many kids have never really given stamps a second thought at this age, but it's such an every-day item, I think it's worth talking about at any age. In this session, the only part of the project we have time to accomplish is to trace the stamp stencil and glue it to the "frame." I created stencils that have the half-circles cut out of the sides of a 9x12" piece of tag board and a rectangle in the middle for the picture. I encourage them to only glue in the corners, so there is no dried glue to draw/color over in the next session.

Next session, is decoration time. We talk about things we wear, see, and do in winter and I write them on the board (no holidays). We also talk about the price of the stamp, which is a great cross-curricular activity with math. The students can choose whatever price they want, but it has to be written correctly. We also talk about things like how much money you have when you have "one hundred cents" and review verbalizing numeric values. After that, I let them loose with crayons and colored pencils and they go to town! I love the variety of results. See for yourself!


Tuesday, December 8, 2009

Paper Woven Stockings/The Beginning

This is the kind of thing you'd think I would start in the summer with those 3 months off, and really, I wish I would have. However, I have only recently discovered the wealth of wonderful art lessons that can be found through fellow art teacher's blogs, and I am hoping that this blog will be equally useful to someone else. I am still learning the ins and outs, so if you have just stumbled upon this humble blog, please bear with me.

I'd like to start this blog with a timely lesson for the season - paper weaving stockings. I love to do paper weaving because I find that some of my kids who think they "aren't good at art," find ease with this project. The way I teach this lesson, there is a lot of prep, but I find it worthwhile since it is a "one-class wonder" (35 minutes - 2nd grade). I pre cut the "looms" by folding a few sheets of construction paper in half and cutting at each inch on the cutting board, as well as cutting the strips.

I give students a 9x12" red loom, a regular 9x12" red paper, and a stencil for the foot part of the stocking. I instruct students to trace and cut the foot first, and then tackle the weaving. I've taught weaving a couple ways - this time I did the simple "over/under" technique, but my mentor teacher taught me a way where the students label each strip on the loom either an X or an O - then go under the X's the first time, under the O's the second, under the X's the third, etc... but while I found this to be effective, it was time consuming and many students can weave without it. While students are weaving, I am circulating the room around and around helping students who need help and pushing the strips to the top of the loom. When they finish weaving, they glue the "tabs"(the ends of the green strips), glue the foot on the bottom, and draw the stitching in the heel and toe.


And for those students who do not celebrate Christmas, I have an alternative "paper weaving T-shirt" lesson ready to go that also uses the red looms:

Art Classroom Tip: Name tags

For as long as I can come up with them, I'd like to include a "classroom management" idea with each lesson. Today, the idea is not a unique one, but a great one for teachers like me who teach at multiple schools. Pre-typed name tags are not always a time saver, but they certainly save me a lot of hassle. I have my name tags organized in computer folders by grade level and then each class list file is named with the grade and teacher. I keep them on a jump drive so I always have the most updated list no matter where I am. The name tag includes the student name with last initial, grade, teacher, and school, so if projects get mixed up, I know exactly who it goes to and what school. Projects are ready for art shows and look just as nice and finished in the hallway at school. I usually pre-staple name tags to project paper for K-2, so I never have to worry about no-name papers. The 3rd-5th graders cut and staple or glue their own name tag to finished projects when they are complete, and they stay in table folders in the meantime (more on that later).