Saturday, February 3, 2018

Kindergarten Heart Fish

I am on a quest to revive this old blog and share some of the things I am doing in my classroom... so let's get right to it!

Within this post you will find the videos that I use for demonstration - feel free to use! I will never place ads in the videos that I create. You will probably also notice that there is no sound - I like to teach "live" with my videos so I mute them when editing. 


This past week my kinder's enjoyed making these cute little fish collages made of hearts. We focused on skill-building and following directions, so the results are all very similar, but we learned a lot and I feel that projects like these are great for practice and confidence-building! Of course there is a lot to say about symmetry, but I also appreciate the fine motor practice this lesson offers with all the tracing, cutting, and gluing it involves.

I am actually in the middle of a unit with my kinders where we are learning how to spell the color words - this week was R-E-D, red! I use the following song as part of my anticipatory set (not my video - does contain ads):


We then begin creating the fish body and tail step-by-step together:

I start by handing them a 9"x6" red piece of construction paper that I have pre-folded (I just fold a big stack at once to get them going) as well as the 1/2 heart stencils. I am very clear that they are not to begin tracing until I have checked their stencils to make sure they are on the FOLD side of the paper (the crease). Once I give them a "thumb's up," they can trace the OUTSIDE of the 1/2 heart (not the red line, I tell them).


They then return the stencils to me (as I double-check their tracing) and we go over the steps for cutting (many will want to only cut 1/2 the paper).


Once they finish cutting, they dispose of their scraps and join me at the carpet area for a story. My Heart Is Like a Zoo by Michael Hall is the perfect accompaniment to this lesson (you can probably also find read-alouds on YouTube)! After the story and a quick review of the R-E-D song, we go over the remaining directions:

The fish body and tail are glued to a 9"x12" piece of construction paper (I chose purple). In order for it to really have that fish shape, we talk about how the points on the hearts have to face the same direction. We also talk about how it needs to be glued lower on the paper so that there is room for the bubbles. The lips are made from a heart traced onto a 3"x3" pink piece of construction paper and this heart needs to point the opposite direction.


Finally, using the same little heart stencil, they trace 3 heart bubbles from a 4.5"x6" teal/blue piece of paper, including a white crayon/pastel "shine" and of course - the most fun part - a giant googly eye. 


Hope you and your students enjoy this sweet little lesson as much as we did!

If you would like the stencils I used, you can find a pdf here. Pro tip: print onto card stock! It saves you a lot of tracing - but you will need to add the red line and "FOLD" if you wish to have that on there.


Monday, December 6, 2010

The "I'm Done" Conundrum - When students finish their artwork early


It's my fourth year of teaching art, and I feel like I'm just getting a handle on this - and really, there's still room to improve (isn't there always, though?). We've all been there - a few kids finish in 20 minutes, others take the full 50 and then some, and the rest are somewhere in between.

For grades 3-5, I'm extremely happy with my current solution - the "I'm Done" station. We go over all the rules/parts the first day of art class, and it has been a dream ever since. I have 3 different schools, and at each it looks a little different - at one it's a table, at another it's a shelf, and at the third it's a cart. At two of the schools, I like to put the parts away that I don't want used while I'm not there because there tends to be under-supervised children in my room at various points in the week.

All 3 stations have: free draw paper (classic), multiplication flash cards (can never practice too much), clay, origami, individual white boards, and drawing books.

Clay

I use regular old modeling clay that can be found at Wal Mart. I keep small balls in sandwich bags and even though the bags tend to be left open, the clay hasn't dried out yet. My genius moment with this one comes in the place mats that read, "I will keep the clay on this mat." I'm very strict about it - if I see the kids with clay and not a mat, or they have their clay off the mat at any time, they have to put it away and cannot use it the next class either (if I remember, let's be honest). It's enough of a threat that it keeps the clay from flying through the air, or from getting dropped all over the floor, or from getting stuck in a neighbor's ear.

Whiteboards

A kind neighbor teacher drilled a hole in my whiteboards so I can attach a marker - otherwise I'm sure they'd walk away. I'm a fan of the mini ones you see in the picture - I got them at Target - because there's a hole at the top to put the string through, and plus, they're cute.

Origami

For the origami, I keep phone books on hand for the origami paper. I teach the kids the first day how to rip out a page and turn the rectangle into a perfect square by folding over the corner and cutting off the excess with scissors. The ones who don't remember after that have to ask the ones who do. The directions are just laminated pages from a copied origami book.

Flash Cards/Drawing Books
The flash cards can be found at the dollar store or Wal Mart super cheap, and I get the drawing books on clearance at the book store whenever I see them.

I have thoughts of adding more things in the future - maybe puzzles, but I can never find any that don't have too many pieces. Plus, I'd really like them to be art-related. In the future, I might copy some pages from this book and keep them as educational coloring pages:


For K-2, I usually have a coloring page/worksheet that goes with the lesson. I say "usually" because at my school, we have a set-up where we don't make our own copies - we send them to a "copy center," which requires us to give them 48 hours notice. For whatever reason, these worksheets seem to always be an afterthought on my part, and I never get to them in time. But, hey, there is always free draw, and I always stick to the rule that they have to keep working on the same single sheet of free draw paper until art is over. This usually discourages the kids who rush through their project just to scribble on 8 sheets of free draw paper. They get one - no exceptions. And more often than not, they surprise me with their creativity and I love to see what they come up with.

What to do with those drawings they want to give you at the end of class? I find it a bit difficult when I'm trying to give clean-up instructions to the class, and 8 students are trying to hand me their free draw papers that they drew especially for me (I'm sure). So this year, I put in a mailbox. Literally, a U.S.P.S. mailbox that I bought at Wal Mart (you'd think I never shop anywhere else). The kids know that if they want to give me a picture, they just have to quickly and quietly slip it in the mailbox, and I will check it at the end of the day. I have a bulletin board where I tack up these treasures - new ones can just be posted over older ones (sometimes they are seasonal, any way). At the end of the year, I pull them down and only keep the ones that are truly special/adorable. Or, if you ask my students, I keep them all forever and always. : )

At Art with Mr. E, Mr. E posted about a brilliant bulletin board he created for these pictures. It's essentially a large paper refrigerator door titled "Mr. E's Refrigerator Art." I thought it was a clever idea.

Wednesday, December 1, 2010

Kindergarten Gingerbread Man


This is one of my favorite lessons of the season, mostly because of the joy the kids get out of the story. The way it worked out was kind of a flook - I couldn't find the actual book, so I made a Power Point of the story using clip art as pictures. This ended up working out even better than the book, because I added a few extra "custom" parts. Here's how I tell the story (each line is a new slide):

The Gingerbread Man: Retold by (You)

Once upon a time there was a little old lady and a little old man who lived in a little old cottage.

The little old woman decided to make a gingerbread man for her little old husband for Christmas.

She mixed the ingredients.

She rolled out the dough.

She cut out a gingerbread man shape.

Then she put it in the oven.

The kitchen smelled SO good as the cookie baked. The little old man was very excited. "Is it done yet?" he kept asking.

Finally, he couldn't wait any longer. He peeked into the oven...

And out jumped the gingerbread man! He ran right out the door! "Stop! We want to eat you!" they yelled.

But the gingerbread man kept on running. He shouted, "Run, run, just as fast as you can. You can't catch me, I'm the Gingerbread Man."

**At this point, I have the students read the "You can't catch me, I'm the Gingerbread Man" part whenever it comes up.**

On the path he saw a dog, who happened to be very hungry. "Stop, I want to eat you!" shouted the dog.

But the gingerbread man kept on running. He shouted, "Run, run, just as fast as you can. You can't catch me, I'm the Gingerbread Man."

He ran through (your school's town). "Stop! We want to eat you!" shouted the townspeople.

**I used a photo of our town I found on our chamber of commerce's website... someday I'd like to take my own.**

But the gingerbread man kept on running. He shouted, "Run, run, just as fast as you can. You can't catch me, I'm the Gingerbread Man."

He ran through (your school). "Stop!" yelled the students. "Stop!" yelled the teachers. "Stop!" yelled (your principal).

**The kids LOVE this slide. "That's OUR school!" they yell.**

But the gingerbread man kept on running. He shouted, "Run, run, just as fast as you can. You can't catch me, I'm the Gingerbread Man."

He came to a forest where he saw many animals. "Stop!" yelled the raccoons. "Stop!" yelled the deer. "Stop!" yelled the squirrels.

But the gingerbread man kept on running. He shouted, "Run, run, just as fast as you can. You can't catch me, I'm the Gingerbread Man."

Soon the gingerbread man came to a wide river. "Oh, no! What am I going to do?!" cried the gingerbread man.

A sly fox came along. "I will take you across the river," he offered. "But you will eat me!" said the gingerbread man. "No I won't. I've already had lunch. Grab onto my tail," the fox insisted. And the gingerbread man did.

But the river was too deep. "Oh, no! My body is getting wet!" cried the gingerbread man.

"Well, climb onto my back and you will be safe," said the fox. And the gingerbread man did.

But the river was still too deep. "Oh, no! My feet are getting wet!" cried the gingerbread man.

"Well, climb onto my head and you will be safe," said the fox. And the gingerbread man did.

But the river was still too deep. "Oh, no! My toes are getting wet!" cried the gingerbread man.

"Well, climb onto my nose and you will be safe," said the fox. And the gingerbread man did.

Suddenly, the fox snapped his head back and gobbled the gingerbread man right up!

The End

I would be happy to e-mail you the Power Point with clip art if you contact me. It's not exactly pretty - but it does the trick. I have dreams of illustrating it myself (or at least making a gingerbread man that doesn't always have a white box around him), but we all know how much free time art teachers have. : )

After the story, we complete a crayon-resist gingerbread man - all wrapped up in a lovely 35-minute session.

Kindergarten Rainbows and Tempera Fun


Well, today was the first day of snow for the winter, so I decided to post about bright colorful rainbows to lighten up this gray, gloomy day.

I use this lesson to not only introduce my kinders to the rainbow order of colors, but it is also my first lesson with tempera. I start out by teaching them my rainbow song (to the tune of "Twinkle, Twinkle, Little Star"):

Red, orange, yellow, green and blue
Don't forget there's purple, too
All the colors that we know
Live up in a big rainbow
Red, orange, yellow, green and blue
Don't forget there's purple too


I have a big rainbow poster that I point to the colors on while singing, and I also add a few motions. We shake our finger with "Don't forget there's purple too," hold our arms and hands out for "All the colors that we know", and form a rainbow with our arms over our heads for "Live up in a big rainbow." It really sticks in their minds - they always remember it after this lesson.

Then it's demonstration time with the tempera. Here are my procedures:

-I keep the paint in solo cups so I can put the tops back on them and save them for later. It wastes very little paint, it's easy to distribute, and it's a small enough amount that if the color gets too contaminated, I'm not super upset about throwing it away and starting fresh.


-If I'm not going to paint again for a while, I wrap the trays in plastic bags, because the solo cups are not completely air tight when paint gets on the rim (which it will).
-I LOVE, LOVE, LOVE brushes with the shorter handles. The long handles are just too much. School Specialty sells them.
-2-4 students share a paint tray and a water dish, depending on how the tables are set up, which makes set up/clean up faster. I just buy clear deli containers from Gordon Food Service for water dishes, and I'm sure they could be found at Sam's club.
-I also give students a piece of paper towel. To make it easier to pass out, I cut down the side of it with a box cutter.

Since I use the solo cups, it's important that the colors don't contaminate each other. Therefore, I tell them to "Swish, swish, swish - Wipe, wipe, wipe, - Dry, Dry Dry - then Dip the Tip" We say this over and over as we paint so they "Swish" the brush in the water, "Wipe" it on the side (not tap, because then the water splatters everywhere), "Dry" on the paper towel so the colored water doesn't get in the paint, and then they "Dip the Tip" of the brush in the paint.

With the rainbow project, they have to switch colors 6 times, so it's good practice. I pre-draw the top of the rainbow with a pencil to give them a starting point, and when they are finished, I glue the song in a cloud so they can sing it at home!

One of my fav's.

Saturday, November 20, 2010

Teaching Tip - Paper, paper, paper

I would guess that if you asked any art teacher what the most important supply is, the answer would probably be paper. That said, everyone has their own needs and wants, and we are often limited by budget.

I'm actually not sure what my budget is per student, but I can afford all the basic supplies, some clay and glazes, and usually one or two special items per yearly purchase, such as texture rubbing plates or new brushes. All in all, I feel pretty lucky.

This is my fourth year teaching art - not exactly a veteran teacher. However, I do feel pretty comfortable with my paper purchases, so here is my limited wisdom on the subject:

Construction Paper
You just can't beat the quality brands like Tru-Ray. The colors are vibrant, the paper is durable, and there is less sun fade than with cheaper papers. Quality construction paper makes the average collage that much nicer. That said, sometimes quantity is more important than quality. After all, you need to have enough paper for all of your projects! The cheaper stuff works just as well in terms of functionality, so it can definitely be something you can compromise on.

Construction Paper Scraps
Kind of off-topic, but I keep a large box of my construction paper scraps, as well as smaller plastic dish washing bins, so I can distribute them to each table. When the pieces get too small or there's too much garbage in the smaller bins, I just dump them and refill from the big box. Just be sure to check for scissors, pencils, etc. that will inevitably be in there, first.

Sketching
Teaching elementary, we do some sketching, but certainly not as much as a middle or high school art class. I like to keep some lightweight manila and newsprint on hand for those situations that I don't need bright white.

Drawing
When it comes to a lesson where we are drawing, I am a sucker for crisp extra extra white drawing paper. I stick with the 50#. My favorite is Sax Extra White Sulfate. One year, I ordered the economical stuff, and was just not happy with the texture, which was almost waxy like newsprint. It made colors look dull, wrinkled and ripped too easily, and pencil lines were difficult to erase. Although I don't feel like you have to get the best of the best, I also believe the cheapest stuff will look, well, cheap.

Painting with Tempera
I don't know if there's a better way, but painting right on construction paper has worked pretty well for me. Yeah, the paper gets pretty flimsy when wet and can rip easily when handled, but it tends to hold up pretty well while the kids are painting. With elementary, it's often nice to start out with a background color, such as a light blue for the sky, so things don't get too muddled together. If the background color doesn't matter or will be completely covered up, a medium-weight manila paper works pretty good, as well.

Painting with Watercolor
This can be controversial somewhat, because I am well aware of the art teachers out there that swear by real watercolor paper and watercolor paper only. I'm actually from the other school of thought - I just don't think it's worth the money. I do buy a small amount for a special project I do with my 5th graders, but other than that, my 50# Sax Extra White Sulfate does the trick. Cheap/economical drawing paper, manila, newsprint, or computer paper? Absolutely not. Most of these papers suck the color right out of the paint, and the paint doesn't stay on the surface long enough to mix colors or spread the paint out.

Tracing Paper
Not much to say about it, but I do a few projects with tracing paper, so I keep it on hand. I buy the packs of 9x12" sheets instead of the roll, because it's just easier when it doesn't roll up on itself when trying to cut or work with it.

Tag board/Railroad Board
I actually haven't needed to purchase any yet because the previous teacher had so much on hand, but I do use tag board for a project every now and again, such as the Aliens project I posted about earlier. It's cheapest to buy in the largest size, and I have found that the black color suits just about every need. I also have lighter-weight manila tag board (feels like a file folder) that I use to make stencils when I need custom ones.

Bulletin Board Paper
While obviously useful for bulletin boards, this can also be used for paper mache to avoid a painting step.

Tissue Paper
Again, not a lot of secret knowledge to pass on about this - A multi-colored pack or two does the trick for me. You just have to think about if you want the colors to bleed, or not, depending on the project. I wish our supplier sold a pack that shipped the large pieces flat, because the folds really tend get annoying when trying to cut small pieces, but I just lay it out and flatten it a few days before I cut it and it's fine.

I believe that's about it. As with any supply, if you can, it's fun to splurge a little bit on a specialty paper for a special project, but if you haven't been buying supplies for a long time, I emphasize the "little bit" until you are very familiar with what you can splurge on and what should be saved for the greater good.

Friday, November 19, 2010

1st Grade - Color Mixing Turkey Collage

This is one of those lessons that I really feel is a keeper. I'm the kind of art teacher who could never do all the same projects year after year, but there are some that I have cemented into my curriculum, and this is one of them.

This takes me two 50-minute sessions. In the first session, I start with a 12x18" piece of white sulfate paper, and have the students fold it into 8 long rectangles. With first grade, this can be quite an experience, but if I take it slow and I check them after each step, I usually only have one or two per class that don't fold it correctly the first time.

We then go through each rectangle and make a pattern of shapes with crayon. The first is blue, second is yellow, third is red, fourth is red/yellow, fifth is red/blue, sixth is yellow/blue, which leaves two blank. I then tell them to watercolor each rectangle with the colors they used in their patterns. If there are two colors in the pattern, they have to mix them, starting with the lightest color first. I love this step because it allows them to discover the secondary colors on their own to see which colors make what. I then let them paint the blank ones however they want, or they can use them to make a color they messed up on before.


During the second class period, we turn the watercolored paper into feathers and create a turkey collage. I happen to be at the Michigan Art Education Association Conference when it was time for my classes to do this part of the lesson, so I made visual posters to direct the students through each step.


I tested it out with a few classes before I left, and I loved how self-directed and independent my little first graders were. I did give them stencils for the body, head, and feathers, and then pre-cut the beak and feet paper into two-inch yellow squares. I then added the googly eyes as a fun way to finish them off.

I love me some googly eyes...


Let me also share with you that I followed up this lesson with my own version of Deep Space Sparkle's Color Mixing Fish. I thought it was a great way to tie up my turkey lesson because they were still mixing colors, but with a slightly different medium (tempera). Hopefully I'll have some of these results up soon!

Thursday, November 11, 2010

4th Grade - Aliens!


I was inspired by a post from one of my favorite blogs: That Artist Woman.

Hers is a frog, but at the end she shows a picture of her son's take on the project - a monster/alien/creature. I took this kid's idea and ran with it.

I started out by having my students trace each of their hands on the sides of a 12x18" piece of white sulfur paper (watercolor paper would be good, too). Then they drew the alien's head in the middle, keeping in mind that they would later weave either one or two eyes (their choice) and glue them on. I had stencils that were the size that the eyes would be on hand so students could be sure they would fit. They could also alter the hands to make them more... out of this world, if you will. After they outlined it heavily with crayon, they had to choose a texture (i.e. watercolor technique) : salt, plastic wrap, marker, crayon or oil pastel. We've experimented with all of these before, so students were aware of the effect the technique would make.

Once the paint was dry, they cut out the alien's head and hands and glued them onto a black piece of construction paper. Then, it was time for the weaving. I simplified the weaving a bit compared to the inspiration project... I just have students weave around the tag board itself, making sure they cut 5 slits (an even number will not work... 5 seemed to be the best amount for the size we were working with).


I also had them use yarn that was already multi-colored. I had several choices for them to choose from - most wanted the bright rainbow. Psychedelic, indeed. Once weaved, the eye(s) are glued on and voila! This project was definitely a hallway crowd pleaser.

I still have a few classes to finish this project with, and I think I'm going to have them oil pastel a space background.

Monday, November 8, 2010

4th Grade - Pastel Leaves with Movement


I just was wandering around some other art teachers' blogs, and came across the title, "Warm Leaves, Cool Breeze." This would be a perfect title for this project, I believe.

We start out by talking about movement in artwork... how lines and where objects are placed can not only make the viewer feel that the objects are moving, but also indicate what direction they are moving. I give students a 12x18" sky blue piece of construction paper (starting with the blue base makes the end product more vivid), and they have to draw their "line of motion" - the line that their leaves will travel across. The line has to fill the paper, and I caution them on making it too wavy or choppy. We then trace leaf stencils along the line of motion. Real leaves would probably work fine, but I made a set of stencils by tracing real leaves on tag board so I could use them for a while - real leaves dry out and become difficult to use. I show the class what a "leaf parade" looks like (the leaves lined up nose-to-tail along the line), and tell them that they do NOT want that. They want the leaves to look like they are naturally blowing in the breeze, so they should turn the leaves this way and that, and the line of motion shouldn't go right through the middle of each leaf. Students also need to add the veins in the leaf, but I warn them not to make them complicated or detailed, because the next step is to outline the leaves and veins with good ol' Elmer's white glue. I have a set of glue bottles set aside that are smaller than my normal class set, and are only used for this project so the hole is nice and new. A good hint is to tell students to go from top to bottom, left to right (or right to left if students are left handed). The glue has to dry for a few days before the next step: color with chalk pastel. We discuss warm and cool colors, and I add brown to the warm list, as the pastels come with a warm brown. They have to use more than one color in each leaf, and the background should be colored and blended in the direction of the "wind."

Now, maybe I'm a control freak, but I know that if I did it any other way, I would have a big mess. I tell my students that they are not allowed to blow the excess chalk dust all over... instead they can just shake it to the floor by holding their paper down next to them. I also have them keep a wet paper towel at their seat for whenever they need to wipe their hands - otherwise my one sink would be way too crowded and nothing would get done!

Let's be honest, it's still messy, but the results are well worth it. The example above isn't quite complete (needs a bit more color in the background), but you get the idea.

Thursday, November 4, 2010

2nd Grade Clay Turkeys

It's about that time again... Thanksgiving is coming up fast, and then winter break is just a hop, skip and a jump away. With conferences in between, there's only so much time to squeeze this project in and get them fired. Here is a step-by-step tutorial to get you started... fired and painted projects to be shown at a later time:

Start with a ball of clay.

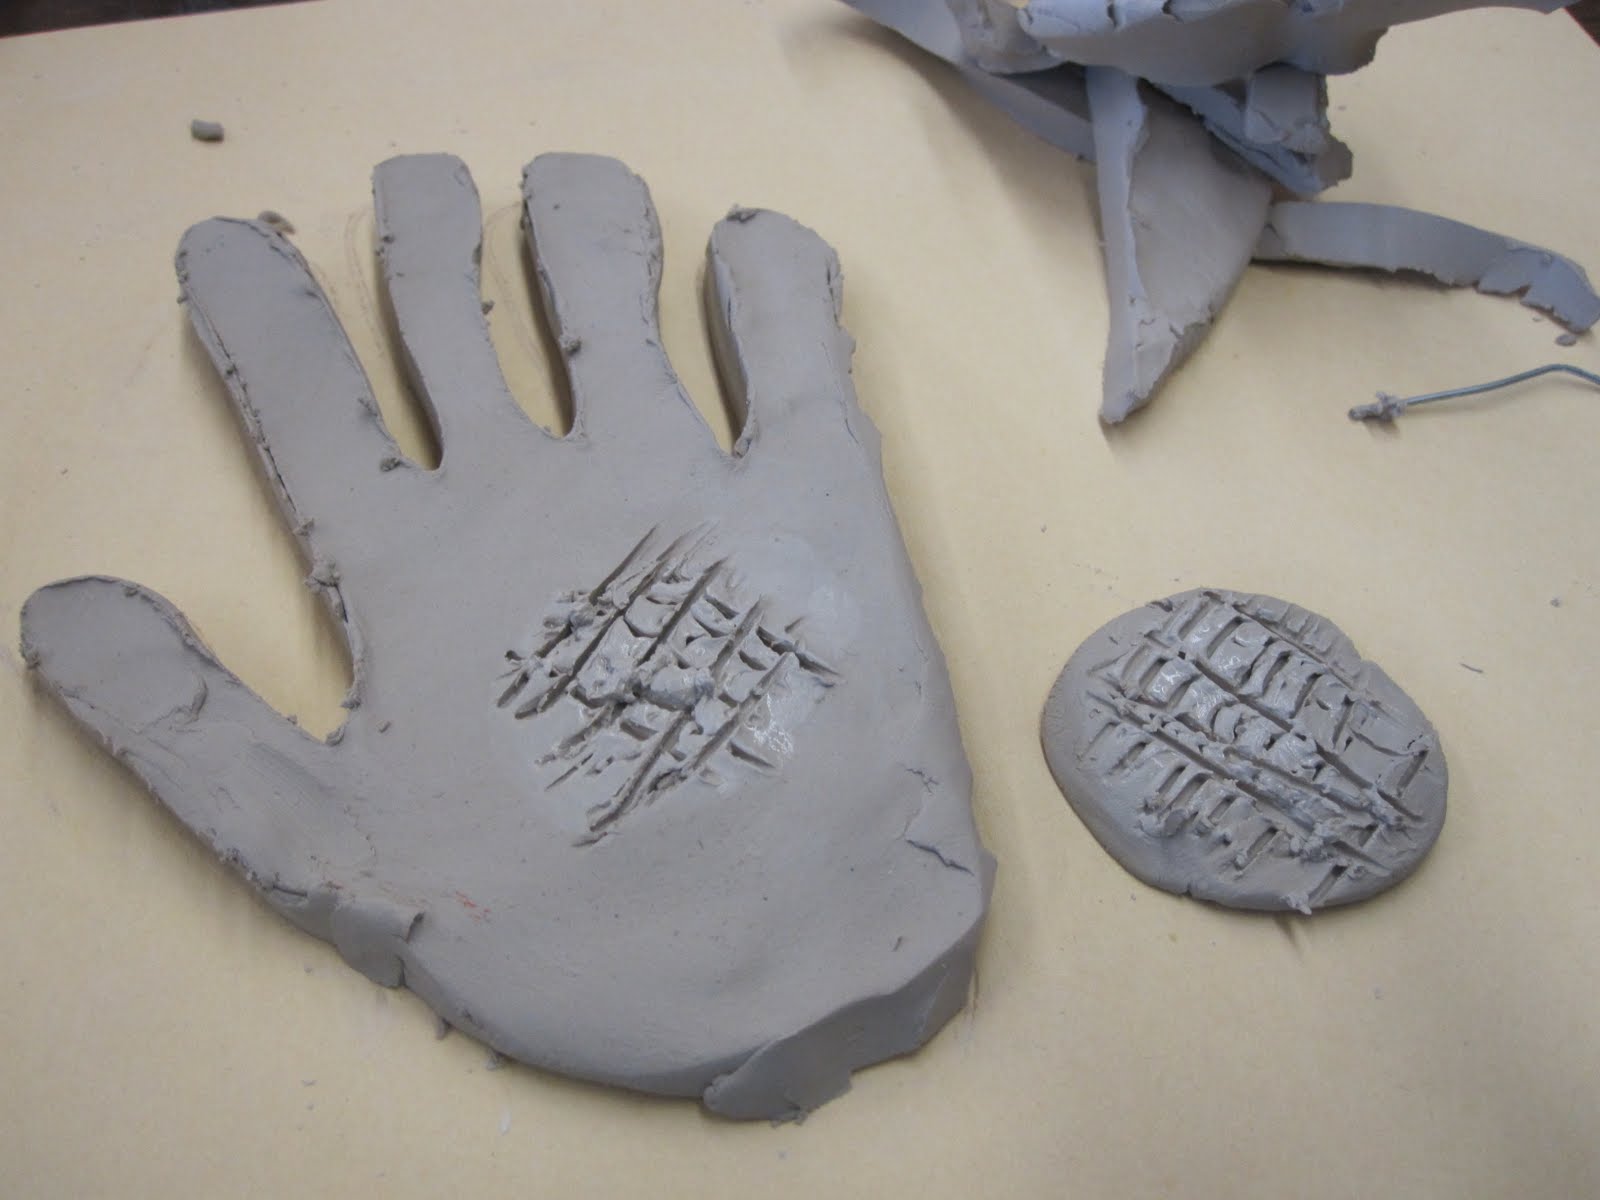
Flatten it out into a "pancake." I tell my students to use the side of their fist. Yes, it's loud for a while, but it saves me time from having to roll them out myself and the cost of rolling pins. I tell them to stop flattening it as soon as they can fit there hand into the pancake.

Trace the hand with a paperclip.

Then use the paper clip to cut all the way through the traced hand, and remove the excess.

Use the excess clay to roll out a marble-sized ball and flatten it out.

Score and slip the circle into the middle of the hand. Instead of "score and slip," I tell them to "wet, scratch, wet." They scratch a "checkerboard" into both surfaces to be stuck together, wet them a little bit with water, then scratch again. I insist that they are sure not to skip this step, or the pieces will fall apart once the clay dry. Sure enough, I've already lost a foot on one of the projects... Add feet using two smaller marbles of clay and same procedure as face.

Add toes, eyes, beak, and snood (what kid won't get a kick out of that word?!).

Since the finished project is flat, I also like to add holes at the top so it could be hung.

For my general tips for doing a clay project with a class, see Clay Pumpkins.

Enjoy!

Sunday, October 31, 2010

Happy Halloween!

Just wanted to share a few results from the 3rd grade pumpkin patch drawing I posted about earlier:


Not quite finished, but definitely one for great craftsmanship and neatness.


This was created by one of my autistic students - I love his creativity and the way he thinks about his artwork. The ground is being colored blue because it is a glacier - that never melts, by the way. The yellow creature on the left is named Gordon, and the red devil creature will get his eye back in 26 years.

Have a happy and safe Halloween!

Wednesday, October 27, 2010

1st Grade - Clay Pumpkins

I love clay. I just love it. There's only enough time and materials for about one project per grade, per year, but the kids always love it, and I'm sure the parents do, too.

Now, I'm one of those lucky ducks who has a kiln, and if I didn't, I would be knocking on every door to get one. Most schools I've worked at have gotten one through a grant. They can even be found used on Craigslist and eBay and the like, but schools can be touchy with ordering from those places and there's always the risk that you won't get what is advertised. I've heard that the Crayola air-dry clay works great, but it is pricey.

The past few years I have been using Sax White Art Clay and have been firing it at cone 05, because it is the cheapest I can find through our supplier. However, I love Versa Clay... I don't remember the brand, but it is the softest clay I've ever used and it fires to a nice white.

I also like Sax Gloss Glazes. They are a little cheaper than Amaco (which is also good), but work just as well, in my opinion.

Every art teacher I've ever known has done this clay project, and I never thought I would. But I tried it this year, and I love it, especially with my little first graders. It's basically just a pinch pot with a pinched stem and a face or lines drawn on it. I have them watercolor them after firing, which actually gives a nice saturation of color. I'll probably glaze them next year, but I just didn't think about it early enough this time.

After firing, before painting...


After painting...


If you've never done clay before, here are my tips:

1. Check the clay the day before you teach the lesson. Sometimes a hole gets poked in the bag during delivery, and the clay might be too hard to work with. If this happens, I ball up the clay into project-size portions, and then spray them in a plastic bag with a water bottle. This usually moistens it enough to work with the next day.

2. Don't blow your budget on expensive clay tools. I've gotten away with paperclips, wooden dowels, straws, plastic cutlery, toothpicks, etc. for quite a while now. I do recommend wire for cutting the clay, and a gauging tool if it is needed for the project.

3. Have your students work on cheap paper "placemats" that have their names on them already. That way, you can scratch the names on the projects later and don't have to worry about it during the possible chaos of the lesson. For my elementary kids, I always put their names on the projects so I can read them later. The placemats also help you determine very quickly who is absent and needs either a project made for them so they can paint it with the class or to come in later and do one themselves.

4. For elementary students, use water sparingly. If you can get away with not using it, don't use it... they tend to make mud very quickly. If you have to use it for score/slip, be very specific about how much to use.

5. Give projects plenty of time to dry before putting them in the kiln. For most things, a week will do, but anything thicker than 1/2" or so might need longer, and obviously it depends on your climate. If it is cold to the touch, it is still drying and should not be fired.

6. Be prepared for breakage. Have extra projects for those that break in the kiln or during transport, and have super glue ready for projects that break after having been fired. They are most delicate before firing, so be extra careful.

7. Do the clay project in one class period - I can't even imagine trying to keep projects moist from day to day.

8. Keep projects in a safe place while drying. I move from building-to-building during the week, and so I am not there to guard the projects every day. I usually even put a sign that says, "Do not touch."

9. If you teach multiple classes, use a code for the classroom teacher to go with the student's name. For example, 2nd grade Mrs. Smith would just be 2-S. I think parents might also like the code to keep track of what year the student made the project.

Tuesday, October 26, 2010

1st Grade - Owls

This is a good lesson for directed-drawing and combining shapes to make an object - an owl! We also use crayon-resist, which is always like magic for my little first graders. We start out by drawing the owl together in steps:

We also draw the moon - students can choose either a full or quarter. We then outline the drawing with Sharpie and color it in with crayon (except the sky!). We then use a yellow crayon to make the stars while pressing VERY HARD. If they don't know how to make a "star," I just tell them to make little "scribbly circles." We finish it off by painting black paint over the sky, and the stars appear under the paint like magic!

I like to incorporate literature and writing wherever I can, and with this project, I had good opportunity to. I started the lesson by reading the chapter "Owl and the Moon" from the book Owl at Home. We finished the lesson by doing some writing. I typed up a sentence starter that said, "It was a chilling night in (our school's town). The spooky owl spied on a ______." and the students completed the sentences with an adjective and a noun. It made for an awesome display!

Sunday, October 24, 2010

3rd Grade - Paper Mache Pumpkins

Paper Mache is messy... there is no way around it. But, it is an inexpensive 3-D project that I think every elementary student should experience. In the past, I've made pinatas and Chinese lanterns, but this time, it's pumpkins. First, I'll explain how I taught the project this time, and then I'll tell you what I'll change for NEXT time (we're always learning as we go, aren't we?). This is going to be a long post, and I apologize for the wordiness, but I'm hoping if you're hesitant about trying this, you might give it a shot if I explain how I did it.

Prep Work:

1. Because I only wanted to do one day of the paste (much easier, believe me), I pre-assembled the structure. I blew up balloons, and then attached a toilet paper roll at the end for the stem. To attach it, I cut slits in the end so it would "flower out" and stick to the end with masking tape. Sorry I don't have a picture of this... I also glue the students' name tags inside the tube so that I can tell them apart.

2. I also arrange my room in a different way to make things go easier. I use half of my tables for the pasting, and the other half as a "clean area" for students to go do a drawing assignment when they are finished. On the messy half, I lay out newspaper or some sort of covering for easy clean-up afterward... I can turn the messy tables into clean tables as students finish.

3. For the paste, I swear by Elmers or School Specialty Art Paste. It's a powder that comes in a little box and mixes with a gallon of water. The trick is to use cold water and stir as you pour so it doesn't get clumpy. It's unscented and doesn't mold like homemade mache tends to... plus it's cheap. It has to sit for at least 15 minutes after mixing, then I pour it into low pans.

4. Rip the newspaper. I like to do this in front of the TV the night before. I rip a whole page in half, against the grain, then rip 2-3 inch strips with the grain.

5. Have paper towel ready. Have large pieces ready to go. I take a roll and cut a slit in it, top to bottom, with a utility knife so the pieces just come off.

Mache Day:

1. I start out by quickly demonstrating how to dip both sides of a newspaper strip into the mache, using "scissor fingers" to squeegee the excess off back into the tray, and then smoothing it down onto the balloon and tube. I tell them they have to do at least 2-3 layers of newspaper, and then finish with ONE layer of paper towel. The only purpose of the paper towel is to have a solid color on the outside so you can't see the newspaper letters and pictures when you paint. The paper towel is just put dry onto the wet balloon, and then smoothed out with a little mache on the hand.

2. When students indicate they are finished with the newspaper, we check to make sure that there is no balloon showing, and also that there is no where that the newspaper is so thin that you can see the color of the balloon underneath it. If it's good, then I give them the paper towel.

The pumpkins need to dry about a week, and rotated throughout so all areas can dry. Before painting day, I pop the balloon and dent the bottom so it will stand up.


Then, they paint! I had a few students who don't celebrate Halloween, so they can just paint lines down the pumpkin for a regular fall pumpkin instead of a jack-o-lantern.


It really was pretty successful, though I might make a few changes next time. Someone at an art ed conference told me that instead of newspaper, they use colored bulletin board paper. This saves the step of painting. I'm thinking it might work well if we paper mached orange bulletin board paper on the balloon alone (no roll). They could paper mache a nametag on the bottom so they could be told apart. Then, after drying, the roll can be glued to the top and painted, along with a face. Less prep for the teacher, more doing for the students.

Almost all students agreed this project was a ton of fun (possibly their all-time favorite), even though I feel like a crazy frenzied teacher when we do it. Definitely worth it for all!


Friday, October 22, 2010

Bats at the Library


This book is super adorable, I must say. Brian Lies has a whole series of Bats at the (Somewhere).... I also enjoy Bats at the Beach. This lesson is very versatile... another version I like to do is with cut paper and glitter for the stars. Either way, it's a good combination of art and literature, and is simple enough that it can be completed in the midst of Halloween party craziness. I once had a sub teach this lesson and he really took off with it and discussed some fun facts about bats with my class - I thought that was wonderful!

Wednesday, October 20, 2010

Halloween Mash-Up

Well, it's been a good long while, hasn't it? I guess starting out, blogging is difficult to be motivated to update without many followers. But, on the flip side, I'm not comfortable 'marketing' this blog until I have a good set of content to fall back on - and proof that I will actually continue to update so it's even worth following.

So, I am back. Now that I am getting used to our new schedule at school, I am ready to squeeze in some time to post.

I am a sucker for holiday projects, ESPECIALLY Halloween. I don't get into Christmas projects as much for whatever reason, but spooky, creepy, and silly lessons are where it's at. For the next few days, I am going to be overloading you with Halloween lesson ideas, as the 31st is coming up fast! Of course, there are always students who don't celebrate some or all holidays, so I have alternatives ready to go as well.

First, I have a Pumpkin Patch project, which I teach to my 3rd graders. It seems like a simple drawing, but there are tons of vocabulary words and drawing skills jam-packed in it. I start by showing my example, below, and asking students why some pumpkins LOOK closer than others. They are always inclined to say, "Because it's closer...", but I insist that it is not actually closer, I just used some drawing "tricks" to make them look that way. Eventually we discover together...

Objects that look closer are...
1... bigger
2... lower on the paper
3... overlapped in front
4... drawn with more detail


We also briefly cover horizon line, foreground, middle ground, and background, and I show them quickly how to make a road/river/railroad tracks that come from the background to the foreground.

Whew!

Students are then free to draw their pumpkin patch and add whatever details they want. It can be a Halloween-themed patch, but it doesn't have to - it can just be a farm or whatever. Before outlining with Sharpie and coloring in with crayons or colored pencils, I usually have students check their drawings with me to be sure they have enough DETAIL. I'll post some kid results later on.

Wednesday, February 10, 2010

Jim Dine Valentines

Jim Dine is the perfect artist to showcase this time of year. His pop art images of hearts go hand-in-hand with Valentine's Day, and allow us art teachers to feel like we're not just doing a silly craft (although those are fun, too, I admit). I've seen many variations of this project on other art ed blogs, but this is my take on it. I do this project with 3rd grade, in two 70-minute sessions. Because it is such a long class period and the watercolor part of it needs to dry, I do this in conjunction with a Chinese New Year project, which will be my next post.

During the first class period, it is all about watercolor. We fold a 12x18" piece of paper 3 times in half so that there are 8 sections. Each section has a different watercolor technique: Wet on wet, wet on dry, crayon resist, oil pastel resist, salt, plastic wrap, and two free spaces.

On the second day, we talk about Jim Dine and his pop art images. Then students choose 4 of their watercolor sections to be hearts, and 4 of them to be squares. I have square stencils for them to use, but they have to create their own heart "stencil" by folding a square paper in half and drawing half a heart. Then the squares and hearts are glued onto a 12x12" black square piece of construction paper. I stress the importance of laying everything out before actually gluing.

The projects make quite a statement in the hallway, if I do say so myself.

Sunday, January 10, 2010

"C" is for Chameleon

These cute lizards are what we make during the letter "C" week for kindergarten.

We start out by reading "A Color of His Own" by Leo Lionni. The story is about (warning: spoiler) a chameleon who wants a color of his own like the other animals, so he decides he will stand on a leaf forever so he will be green. But, as we all know, leaves change color, so that didn't work out too well. Eventually another chameleon comes along and says that even though they will always change color wherever they go, if they always stay together, they will always be alike. I find that the children have great empathy for the chameleon in the story and really understand the message of friendship (I usually get a rousing "awwwww!" at the end). The book itself is also a great review of colors.

I have stencils for them to use, but the different colors/designs create a lot of variety in the finished product! We also talk about how pressing hard with crayon makes a fun effect when painted over with watercolor.

Thursday, January 7, 2010

Winter Stamps

Well, winter break is over but winter is not. Bring on the winter projects!

Today I bring you a favorite of mine - winter stamps. I do this lesson with second graders in two 35-minute sessions. The first day, we look at stamps and talk about them. Many kids have never really given stamps a second thought at this age, but it's such an every-day item, I think it's worth talking about at any age. In this session, the only part of the project we have time to accomplish is to trace the stamp stencil and glue it to the "frame." I created stencils that have the half-circles cut out of the sides of a 9x12" piece of tag board and a rectangle in the middle for the picture. I encourage them to only glue in the corners, so there is no dried glue to draw/color over in the next session.

Next session, is decoration time. We talk about things we wear, see, and do in winter and I write them on the board (no holidays). We also talk about the price of the stamp, which is a great cross-curricular activity with math. The students can choose whatever price they want, but it has to be written correctly. We also talk about things like how much money you have when you have "one hundred cents" and review verbalizing numeric values. After that, I let them loose with crayons and colored pencils and they go to town! I love the variety of results. See for yourself!


Saturday, December 19, 2009

Clay Texture Hearts

Our kindergarten classes learn a new letter each week, and I try to follow along and do a project that incorporates that letter. Sometimes the order really works in my favor... when we created the clay hearts, the letter was "T" for "texture," and when we glazed them a couple weeks later, it was "H" for "heart.

This project is simple, and the results are beautiful. It can be completed with 24 kids, no aides, in 35 minutes. The only major prep is to portion the clay into balls so it is quickly distributed.

First, the clay balls are pounded down into a flat disc - this is noisy, but the kids love it and it saves me from pre-rolling slabs. We talk about what is too thick and too thin - and worse case, they are too thin and have to be rolled again. Then they trace a heart stencil with a wooden stick. Once traced, they use a stretched-out paper clip to cut them out (just as good as real clay tools). Then comes the real fun - I have "texture trays" on the tables with various materials like plastic forks, straws, etc for students to make textures with on their heart. I tell them it's best not to poke through the clay too much. As they finish, I write their name on the back of their heart, poke a hole in the top, and they work on a "T" handwriting/coloring page to finish up the time.

For glazing, I take about 5 students at a time to a glazing "center" as they are working on a different project that they can complete fairly independently. They choose one color to glaze the top with. I really enjoy the Sax True Flow Gloss Glazes available at School Specialty: Art Education - though I just saw some glazes from Roven Ceramics at an Art Ed conference that come in powder form and are nicely priced.

Adorable.

Wednesday, December 16, 2009

Tessellation Chameleons

I believe I first saw this project in an Arts & Activities Magazine, and I HAD to try it. I've always loved tessellations - great for pretty much any ability level, cross-curricular with math, looks amazing hanging in the hallway - but on their own they can be sort of, well, boring. The lizard twist makes them look cool and I always have the student stamp of approval when I do this project with my 5th graders. The first year I taught this, I did it on 12x18 paper (I like big projects), but the coloring got to be a little cumbersome, so this year I did it on 9x12, which I think works pretty well. I could *probably* get this done in three 35-minute periods, but I'm going to do it in four to allow for stragglers and those who were absent to catch up. Here's how I teach this lesson:

Day 1: Introduce tessellations and the artist M.C. Escher (gotta love him). Create the tessellation stencil with a square piece of tag board.

Day 2: Trace tessellation stencil across 9x12 paper and begin coloring. I have them outline with marker and color in with crayons or colored pencils (I note that crayons are faster, but colored pencils allow for more detail - but it's up to them). Most students get close to, if not finished with, coloring at this point. For the kids that missed Day 1, we make a quick stencil and they catch up pretty quickly.

Day 3: Finish coloring, trace lizard on tessellation and cut out (I really stress that the scissors have to stay on the pencil line ALL the way around the lizard so the "scrap" isn't cut into a million pieces). Now, last year I had students draw their own lizard stencil and trace it on the tessellation, but between the big paper and that, it took 6-7 classes for this project. So, since drawing a lizard isn't the pivotal part of this lesson, I allow them to use my pre-made stencils. Then they glue the "scrap" part of the tessellation to a piece of construction paper. The tessellation lizard is folded in half and the feet only are glued onto the paper.

Day 4: Catch up for those who were absent or need a little bit more time. Quick alternative project for those who are done.

This is a big crowd pleaser in the hallway... lots of "ooohs" and "aaahhhs". Enjoy.


Art Classroom Tip: Pencil Hell

I can't believe how much thought I can put into writing about such a simple thing, but in an art room, a nice sharpened pencil is something that students need for almost every project, and it can be the cause of a lot of stress.

One thing we have to tackle is for our students to have a pencil in the first place. Many art teachers require that students bring their own pencil to class, which can work fairly well if carried out correctly. But with this comes two problems:

1. Pencils break/become dull.
2. Some kids will inevitably not bring one for whatever reason.

For some teachers, #1 really isn't a problem because there are sharpeners, but for me, I loathe pencil sharpening in the middle of class. I don't know about you, but I have at least 10 students in every class who will use any excuse they can come up with to get out of their seats, and pencil sharpening is a perfect one. Electric sharpeners are obnoxiously loud and can get clogged, and the manual on-the-wall variety are still sort of loud, and get clogged quite often, in my experience.

As for problem #2, most teachers who require students to bring pencils will have pencils to borrow if they are not brought. These extra pencils can be traded for a shoe or a fake flower can be attached on the end to make sure they are returned.

I like to avoid pencil sharpeners (during class) and strict borrowing all together.

My pencil procedure (which I got from my mentor teacher while interning) is to keep pencils for students to use on the tables (a few more than there are students), and then have sharp pencils ready that students can "trade" a dull one for to avoid using the sharpener. My initial thought was to be really persnickety about it and be firm that EVERY time a student took a sharp pencil, they traded the dull one, but that became not worth the effort it took to keep track of. It requires a bit of prep on my part - I have to be sure the pencils are sharp at the beginning of the day - but it never takes up my class time with students and for that, it is totally worth it. Now, for those of you who have tried this and have the dreaded pencil thieves, I seem to have solved this well enough to work for me. The answer is: The Ticonderoga Beginner Pencil. I have grown to love this type of pencil in my art room and it has earned its capital letters.

Why do I love it?
1. Great for small hands. After all, they are a "beginner" pencil.
2. Since no one else seems to use them, they are always identified as art pencils and if they walk out of the art room, I usually find them in my mailbox eventually.
3. Since they are big and "kiddish" looking, the big kids don't want to steal them. How uncool would that be?
4. With the big lead, they get dull slower than regular pencils.

Now, School Specialty has their own brand of cheaper beginner pencils, but unfortunately, they don't fit in my electric sharpener in one building and at the other, they JUST fit but are still difficult to sharpen. This just doesn't work for me since I like to quickly sharpen them at the beginning of each day. For me, the Ticonderoga Beginner is worth the minor extra expense. I purchase the variety without the eraser, and then keep erasers on the tables as well.

While we're on the subject of pencils, let's delve right into colored pencils since it pertains to this project, as well. Obviously, one could never spend the time pre-sharpening colored pencils for students, and this needs to be done during class time. However, nothing clogs an electric or on-the-wall sharpener faster than colored pencils. Hand sharpeners are easy to unclog, but then there are shavings to deal with. So, I keep hand sharpeners on the tables along with a little dish for shavings. Students know that part of their clean up is to empty the shavings out of the dish. Please note that I do NOT keep colored pencils on the tables all the time - I just bring them out when I need them for specific projects. I've heard that the Crayola Color Sticks work great (and the Prismacolor ones are even better), but I don't really have the budget to get a bunch of them right now and I still have a ton of colored pencils to use up before I would consider it.